Open source trading platforms

While searching for my life-long dream of developing a trading platform, I found these to be fully matured.  All are Java based.

  • Eclipse Trader is an Eclipse Rich Client Platform (RCP) application focused to the building of an online stock trading system.
  • Humai Trader Platform is a free, open source stock technical analysis platform built on pure java. The project was renamed to Blogtrader.
  • jrobotrader is a simulation platform for automated stock exchange trading.
  • ActiveQuant open source java trading libraries and the former version ccapi2.
  • TA-Lib: Technical Analysis Library is now also available as a pure java library.
  • Rmetrics Software for Financial Engineering and Computational Finance (not Java!).
  • Open Java Trading Platform is meant to be a common infrastructure to develop stock trading systems.

Scala: The Java for concurrency

While researching about Scala, I found this on the net:

According to Adam Bien’s blog from JavaOne

During a meeting in the Community Corner (java.net booth) with James Gosling, a participant asked an interesting question: “Which Programming Language would you use *now* on top of JVM, except Java?”. The answer was surprisingly fast and very clear: – Scala.

Some more complete source: http://thejavablog.wordpress.com/2008/05/08/javaone-day-three/

Subversion client connecting using SVN+SSH

If you have different username from the SVN remote:

Setup ssh_config
Host <www.domain.com>
User <username in the domain.com>

Subversion and SSH

Subversion allows you to use SSH as the network protocol by using the svn+ssh:// scheme in the repository URL. One downside to this is that the only way to specify your remote username is in the URL, for example:

svn+ssh://dribin@svn.example.com/repo

This is all fine and dandy if you’re just doing a checkout, but this can cause problems if you want to use the svn:externals property. If you include a username in your URL, no other user can use the external without your remote password. Ideally, you want to allow each user to use their own username in the URL. Unfortunately Subversion has no way to override the SSH username in the URL. The trick around this is to not use usernames in URLs at all:

svn+ssh://svn.example.com/repo

You can then specify your remote username in your $HOME/.ssh/config:

Host svn.example.com

User dribin

OpenSSH Public Key Authentication

Public Key Setup | Configure ssh-agent Process | Agent Forwarding

Secure Shell (SSH) public key authentication can be used by a client to access servers, if properly configured. These notes describe how to configure OpenSSH for public key authentication, how to enable a ssh-agent to allow for passphrase-free logins, and tips on debugging problems with SSH connections. Password free logins benefit remote access and automation, for example if administering many servers or accessing version control software over SSH.
Public key authenticate can prevent brute force SSH attacks, but only if all password-based authentication methods are disabled. Other options to protect against brute force SSH attacks include pam_tally, or port knocking. Public key authentication does not work well with Kerberos or OpenAFS, which require a password or principal from the client.
Definition of terms used in this documentation:

  • Client: the system one types directly on, such as a laptop or desktop system.
  • Server: anything connected to from the client. This includes other servers accessed through the first server connected to.

Never allow root-to-root trust between systems. If required by poorly engineered legacy scripts, limit the from access of the public keys, and if possible only allow specific public keys to run specific commands. Instead, setup named accounts for users or roles, and grant as little root access as possible via sudo.

For more information, see also SSH, The Secure Shell: The Definitive Guide. SSHKeyChain offers integration between the Apple Keychain and OpenSSH.

Public Key Setup

Key Generation | Key Distribution | Key Access Limits
First, confirm that OpenSSH is the SSH software installed on the client system. Key generation may vary under different implementations of SSH. The ssh -V command should print a line beginning with OpenSSH, followed by other details.
$ ssh -V
OpenSSH_3.6.1p1+CAN-2003-0693, SSH protocols 1.5/2.0, OpenSSL 0x0090702f

Key Generation

A RSA key pair must be generated on the client system. The public portion of this key pair will reside on the servers being connected to, while the private portion needs to remain on a secure local area of the client system, by default in ~/.ssh/id_rsa. The key generation can be done with the ssh-keygen(1) utility.
client$ mkdir ~/.ssh
client$
chmod 700 ~/.ssh
client$
ssh-keygen -q -f ~/.ssh/id_rsa -t rsa
Enter passphrase (empty for no passphrase): …
Enter same passphrase again: …

Do not use your account password, nor an empty passphrase. The password should be at least 16 characters long, and not a simple sentence. One choice would be several lines to a song or poem, interspersed with punctuation and other non-letter characters. The ssh-agent setup notes below will reduce the number of times this passphrase will need to be used, so using a long passphrase is encouraged.
The file permissions should be locked down to prevent other users from being able to read the key pair data. OpenSSH may also refuse to support public key authentication if the file permissions are too open. These fixes should be done on all systems involved.
$ chmod go-w ~/
$
chmod 700 ~/.ssh
$
chmod go-rwx ~/.ssh/*

Key Distribution

The public portion of the RSA key pair must be copied to any servers that will be accessed by the client. The public key information to be copied should be located in the ~/.ssh/id_rsa.pub file on the client. Assuming that all of the servers use OpenSSH instead of a different SSH implementation, the public key data must be appended into the ~/.ssh/authorized_keys file on the servers.
# first, upload public key from client to server
client$
scp ~/.ssh/id_rsa.pub server.example.org:

# next, setup the public key on server
server$ mkdir ~/.ssh
server$
chmod 700 ~/.ssh
server$
cat ~/id_rsa.pub >> ~/.ssh/authorized_keys
server$
chmod 600 ~/.ssh/authorized_keys
server$
rm ~/id_rsa.pub
Be sure to append new public key data to the authorized_keys file, as multiple public keys may be in use. Each public key entry must be on a different line.
Many different things can prevent public key authentication from working, so be sure to confirm that public key connections to the server work properly. If the following test fails, consult the debugging notes.
client$ ssh -o PreferredAuthentications=publickey server.example.org
Enter passphrase for key ‘/…/.ssh/id_rsa’: …

server$

Key distribution can be automated with module:authkey and CFEngine. This script maps public keys stored in a filesystem repository to specific accounts on various classes of systems, allowing a user key to be replicated to all systems the user has access to.
If exporting the public key to a different group or company, consider removing or changing the optional public key comment field to avoid exposing the default username and hostname.

Key Access Limits

As an optional step to limit usage of the public key for access to any servers, a from statement can be used before public key entries in the ~/.ssh/authorized_keys file on the servers to limit where the client system is permitted to access the server from. Without a from limit, any client system with the appropriate private key data will be able to connect to the server from anywhere. If the keypair should only work when the client system is connecting from a host under example.org, set from=”*.example.org before the public key data.
server$ cat ~/.ssh/authorized_keys
from=”*.example.org” ssh-rsa AAAAB3NzaC1…

If a text editor is used to add the from option, ensure the data is saved as a single line; some editors may wrap the public key and thus corrupt the data. Each public key in the ~/.ssh/authorized_keys file must not span multiple lines.
Multiple hosts or addresses can be specified as comma separated values. For more information on the syntax of the from option, see the sshd(8) documentation.
from=”*.example.org,10.*,external.example.com” …

Configure ssh-agent Process

To reduce the frequency with which the key passphrase must be typed in, setup a ssh-agent(1) daemon to hold the private portion of the RSA key pair for the duration of a session. There are several ways to run and manage ssh-agent, for example from a X11 login script or with a utility like Keychain. These notes rely on the setup of ssh-agent via an @reboot crontab(5) entry, along with appropriate shell configuration.

The ssh-agent must only be run on the client system. The private key of the RSA key pair must remain on the client system. Agent forwarding should be used to make the key available to subsequent logins to other servers from the first server connected to.

1. Startup cron job

    The following crontab(5) entry should run the agent at system startup time. The crond daemon on BSD and Linux systems should support the special @reboot syntax required for this to work.

    @reboot ssh-agent -s | grep -v echo > $HOME/.ssh-agent

    To setup the agent for the first time without having to reboot the system, run the following.

    $ nohup ssh-agent -s > ~/.ssh-agent

    Once the ssh-agent is running, any shells already running will need to source in the environment settings from the ~/.ssh-agent file. The SSH_AUTH_SOCK andSSH_AGENT_PID environment variables set in this file are required for the OpenSSH commands such as ssh and ssh-add to communicate with the ssh-agent on the client system.

    $ . ~/.ssh-agent

    Notes on configuring all shells to be able to run arbitrary commands are available. This reduces the initial setup to the following commands, which can be done from the script reagent.

    $ nohup ssh-agent -s | grep -v echo > ~/.ssh-agent

    $ allsh – < ~/.ssh-agent

    If csh or tcsh is being used instead of a Bourne-based shell, replace the -s argument with -c, and the source command used instead of . in any running shells.

    2. Shell startup script changes

      The shell’s startup script on the client system will need to be modified to pull in the required environment settings from ~/.ssh-agent and setup useful aliases. The agent settings in ~/.ssh-agent should not be read in if the client system is being connected to as a server. Remote connections set the SSH_CLIENT environment variable, so~/.ssh-agent must not be read in when this variable contains data.

      [ -z “$SSH_CLIENT” ] && . $HOME/.ssh-agent

      alias keyon=”ssh-add -t 10800″

      alias keyoff=’ssh-add -D’

      alias keylist=’ssh-add -l’

      The -t option to ssh-add will remove keys from memory after the specified number of seconds. This option prevents the keys from being left unlocked for long periods of time. Older versions of OpenSSH will not have the timeout -t option.

      For the csh and tcsh shells, slightly different configuration of the agent and aliases is required. Consult the relevant ssh-agent(1) and shell documentation.

      Once the ssh-agent is running and shell configured to read in the appropriate settings and set easy aliases, enable the key then test a login to a remote server. Thekeyon will only need to be run when initially adding the private key data to ssh-agent, and only rerun if ssh-agent is restarted or the key is removed with keyoff.

      client$ keyon

      client$ ssh server.example.org
      server$ exit
      client$ keyoff
      Use the keylist command to see what keys are in the agent process.

      $ keylist

      1024 01:a1:aa:34:21:bc:7d:a4:ea:56:a4:a1:1a:c5:fa:9f /home/…/.ssh/id_rsa (RSA)
      If password free logins do not work, see tips on debugging problems with SSH connections to work out where the problem may be.

      To make other applications not run from a shell aware of the agent, the environment definitions in the ~/.ssh-agent file will need to be read into the software in question. Consult the documentation for the software to see whether this is possible.

      Agent Forwarding

      For simple client to server connections, SSH agent forwarding will not be a concern. However, if from the server connected to, one logs into other servers, SSH agent forwarding will need to be enabled. If SSH agent forwarding is disabled, a private key must be available on the proxy system that is recognized by the server being connected to.
      To enable forwarding, either use the -A option to ssh when connecting, or set ForwardAgent in an OpenSSH config file, such as ~/.ssh/config. Note that command line arguments override the user-specific configuration file, which in turn can override the global ssh_config configuration file, if any.
      Host *

      ForwardAgent yes


      ForwardX11 no

      Agent (and X11) forwarding may represent a security risk, providing more options to an attacker on a compromised server to work back to the client system. If paranoid, disable Agent and X11 forwarding by default, and only enable the features where needed. Also enable StrictHostKeyChecking and use configuration management software such as CFEngine to distribute a global ssh_known_hosts file to all client systems.
      Washing car tips

      car_wash1

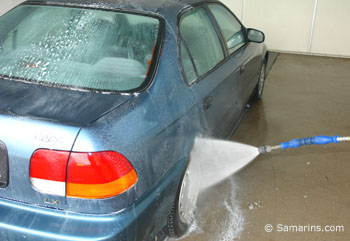
      Wash your car regularly – I’d recommend to do this at least once a month. Things like bugs, bird’s dropping, or limestone dripping damage the paint leaving permanent stains if not washed off in time. When the car is clean, all the moisture dries up quickly, but when it’s dirty, the moisture accumulates in dirty areas causing corrosion. At least once in a while use pressure wash (pressure wash can be found at coin car wash stations) – it removes the dirt from difficult to reach areas. Don’t hold the pressure wash jet too close to the painted surfaces, it can peel off the loose paint. Wash off all the places where the dirt and salt could be accumulated; for example, behind moldings, inside wheel arches, under the bumpers, etc. It’s particularly helpful after winter season – to wash out all the salt accumulations that speed up the corrosion process. Don’t forget to wash all the dirt from the windshield. The sand that left out on the windshield gets caught by the windshield wipers blades and scratches the windshield when the wipers are operating.


      How to wax your car

      car_wax3a

      Wax your car regularly. A car wax gives shiny look to your car and helps to shield the paint from harsh environment, protecting it from fading. It takes only about 30 minutes to wax a whole car and high-quality car wax stays on the car for three – four months. So far, I haven’t seen a single product that stays for life time as you may have heard in some commercials – nothing lasts forever. In order to maintain protective coat any product needs to be reapplied periodically.
      Follow this link for illustrations:
      How to wax a car


      Undercoating and rustproofing your vehicle

      car_rustproof
      Brake proportioning valve

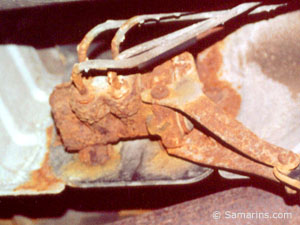
      If you live in an area with high humidity, or where the salt use is common in winter months, undercoating and rustproofing you car can be very helpful. Look at the picture, this is a part of the brake system located underneath the car, it’s completely rusted as you can see. This is only five years old vehicle from a high humidity, coastal area. Sometimes later one of these brake lines can burst and the car will have no brakes.
      Properly done undercoating and rustproofing can protect important components of the car from corrosion.

      How to remove residue marks (paint) left by other objects

      2229

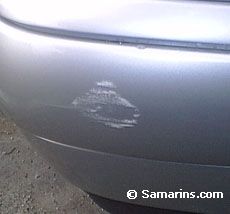
      This mark on the bumper was made in the underground parking. If you look very closely it’s actually white paint residue over original clearcoat. The clearcoat itself seems to be damaged only slightly. I’ll try to remove this mark.

      2225

      All I need for this is ultra-fine 1500-grit or 2000-grit waterproof sandpaper (the higher number stands for the finest abrasive), polishing compound containing mild abrasive (I used the Turtle Wax) and a car wax (I used Turtle Wax liquid car wax with Carnauba).

      2233

      Very carefully (I don’t want to remove the clearcoat) I sand the marks with wet sandpaper (use only ultra-fine waterproof sandpaper) until all marks are gone. If you have never done it before, try on some small spot to see how it works first.
      Now there is no mark, but the clearcoat has lost its shine; I will use polishing compound to restore the shine.

      2236

      I put small amount of the polishing compound onto the damp sponge and rub well until the clearcoat becomes shiny.

      2240

      Last step, I buff the area with the car wax.

      How to repair car stone chips

      stonechip

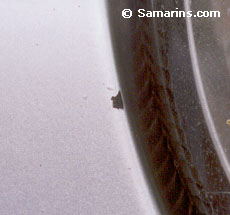
      The stone chips if not repaired in time will cause corrosion like in this photo. That’s why it’s good idea to repair stone chips as soon as they appear.

      2243s

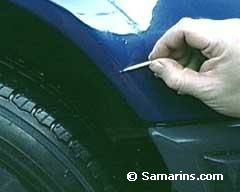
      This one is not corroded yet, so we’ll try to repair it. The car is clean and dry and we have all we need – the matching spray paint ordered from a dealer and a toothpick. If you have a touch-up paint with the brush you can use it instead, although I found that with a sharp toothpick you can do more accurate job.

      2244s

      After shaking the spray paint very well (for a few minutes) spray very small amount into the cap

      2242s

      Now, slightly deep the end of the toothpick into the paint in the cap. Very carefully, I’m trying to barely fill up the damage with the paint without letting it to come out.

      2241s

      Now it looks much better and it won’t be corroded later.

      How to wax a car


      car_wax
      Wax forms thin transparent layer over the paint that covers minor scratches
      Waxing gives your car natural shine and helps to protect the paint from harsh environment. When applied, the wax forms a thin transparent layer over the car paint. This layer covers minor scratches, stone chips and other damages, making them less visible. The wax also ‘seals’ the paint, preventing water from contacting the bare metal exposed in deep chips and scratches, slowing down the corrosion process.
      For best results, a wax needs to be reapplied regularly – none of the available car wax products will stay permanently on your car. From my observations, a good-quality car wax stays on the car for about three-four months, so if you wax your car at least every three months using a good product, you’ll be OK.

      If a car hasn’t been waxed in a very long time, first, it make sense to take it to a local detailing shop, or you can visit your dealer (e.g. for an oil change) and ask for one of those detailing packages they offer. What they do, they buff the car with electrical buffer using special polishing compound containing a mild abrasive to remove light scratches, hard stains and other impurities on the paint, then they wax it. After your car has been detailed, you can simply reapply wax every three months or so to keep it shiny.

      To wax your car you will need some good quality wax (e.g. Carnauba wax), a small soft sponge and a clean soft cloth towel. Your car must be very clean and dry. I usually wax my car right after washing it at the coin car wash; the whole process of washing, drying and waxing takes about an hour.
      Make sure to choose the right product – you need the wax with no abrasives. Read the directions on the package for any specific product and test it on some small area first.
      Park your car somewhere in the shadow – usually it works better when the car surface is cool to the touch. Work on one section at the time, for example, on one fender or door.

      car_wax1 If you use liquid wax, shake the bottle well before use. Apply small amount of wax to the sponge and spread it evenly on one section of the car. It’s good idea to start from the top and do the bottom panels last because there is always some dirt left at the bottom.
      car_wax2 You want to make a thin, even layer of wax. Try not to touch the surfaces like black window trim, rubber door seals and black matte plastic – the wax will leave white stains on them. Work on one section at the time.
      car_wax3 Allow the wax to haze (takes about a minute or two). Then buff it to a perfect shine with clean soft towel, rotating it frequently – clean part of the towel works best.
      car_wax4 After the whole car is done, clean the wax from matte unpainted surfaces (e.g. plastic mouldings, unpainted bumper, rubber door seals). Window spray cleaner will work well for this purpose.
      civic I recommend to wax your car regularly, for example, once in every three months. I tried many products and non of them stays permanently. Any car wax needs to be reapplied regularly.

      Fat burner Suppliments

      Source: http://www.bodybuilding.com/store/bsn/cheat.html

      BSN Cheaters Relief

      A must have for when dieting, limiting fat gain in the off-season or when indulging in calorie rich foods, CHEATERS RELIEF™ provides the calorie control you’ve been looking for from a dietary supplement. The unique blend of ingredients contained in this product help to inhibit regulatory enzymes responsible for carbohydrate and fat digestion. By inhibiting the action of these enzymes, calories from these macro-nutrients cannot be fully digested and thus not re-absorbed, limiting the uptake and storage of these nutrients. CHEATERS RELIEF™ also contains a special blend of ingredients, designed to shuttle “good” nutrients into the muscle cell and limit additional food cravings. Now you can enjoy your favorite cheat meal without the guilt!

      DESIGNED TO SUPPORT AND ENHANCE:
      Weight Maintenance when Eating Calorie-Rich Foods (“cheating”)
      Control of Blood Glucose and Insuling Levels already in normal range
      Calorie Partitioning (“pushing” of calories into lean muscle tissue and away from fat stores)

      Product Profile:

      Carb & Fat Inhibitor Proprietary Matrix: Chitosan: A natuarally occuring substance that has the ability to bind fat, up to 7 times its size Cassia Nomame (Cassia Mimosoides)(seed extract 10:1): A plant extract that can inhibit the lipase enzyme, the enzyme responsible for fat digestion. NeOpuntia® (Opuntia Ficus Indica): NeOpuntia® is a natural lipophillic fiber complex that has been shown in vitro to bind fatty acids. It may also help to maintain blood glucose levels in a normal range. Carb Relief and Glucose Regulator Blend: Phaseo-Lean™ (White Kidney Bean Extract Phaseolamin):Phaseo-Lean™ inhibits the alpha amylase enzyme; responible for carbohydrate digestion, thus slowing the rise in blood glucose and insulin levels in response to meals. Citrilin HCA™ (Garcinia Cambogia 50% extract for Hydroxycitric Acid [HCA]):HCA inhibits the ATP citrate lyase enzyme; responsible for the synthesis of fatty acids. HCA additionally increases fat oxidation, enhances brain serotonin levels and suppresses appetite. R-ALA (R-Alpha Lipoic Acid):R-ALA is used to support insulin sensitivity and the uptake of glucose to be stored as glycogen. R-ALA may also reduce the accumulation of lactate during exercise. 4-Hydroxy-Lean™ (4-Hydroxyisoleucine extracted fromFenugreed): Stimulates insulin release and the promotion of muscle cell glucose uptake and glycogen synthesis post workout. Cinnulin-PF®:An aqueous extract of cinnamon that is rich in uniquely linked proanthocyanidin antioxidants. These compounds “turn on” cellular signaling mechanisms normally carried out by insulin. Cinnulin-PF maintains blood glucose, cholesterol and triglyceride levels.
      MuscleTech Hydroxycut Hardcore
      When the goal is to get completely diced, everybody can use a little help. This is where Hydroxycut® Hardcore America’s #1 hardcore fat burner plays a starring role. Team MuscleTech™ researchers definitely went the distance when formulating Hydroxycut Hardcore. This amazing product is backed by more than 10 years of research and has been scientifically engineered to get you hardcore results! Hydroxycut Hardcore stands head and shoulders above any other so-called “fat burners” on the market!Hydroxycut Hardcore already has a following of hundreds of thousands and the number is still climbing. You know a fat burner is truly hardcore when so many professional bodybuilders swear by it. Pros such as Jay Cutler, Darrem Charles, David Henry, Gustavo Badell, Johnnie Jackson, and the list continues. They all put their trust in the most powerful hardcore fat burner available, Hydroxycut Hardcore. They know the science that stands behind it and they know firsthand that Hydroxycut Hardcore truly works!

      Hydroxycut® Hardcore was formulated by the brilliant scientific mind of the one and only Dr. Marvin Heuer. In his many years within the medical industry, Dr. Heuer researched and developed many products for several major pharmaceutical companies. But it was always his passion to create the highest quality sports nutrition supplements, and that is exactly what he has done with Hydroxycut Hardcore.

      Hydroxycut Hardcore has multiple clinical studies proving the extreme effectiveness of its key components. For example, the first study on the components of Hydroxycut Hardcore was conducted at the University of Laval, and the results were absolutely shocking!

      A double-blind placebo-controlled study was conducted where subjects took either the key active components or a placebo and the researchers measured the metabolic rate of each subject. When the subjects took the key components in Hydroxycut Hardcore they increased their calorie burning over a 24-hour period! That is absolutely crucial for anyone looking to burn as much fat as humanly possible.

      Hydroxycut Hardcore’s scientifically advanced formula is packed with over 12 additional ingredients for truly dramatic results.

      In another 12-week clinical study, researchers set out to measure the actual changes in bodyfat. A key component in Hydroxycut Hardcore was proven to decrease total fat area by an astounding average of 7.9 percent more than a control group. In fact, subjects using the key component in Hydroxycut Hardcore decreased their total fat area by 26.7 cm2 while the control group only decreased the total fat area of placebo subjects by 6.7 cm2. This was computed using a procedure known in the scientific community as computed tomographic scanning.

      As if that wasn’t already enough, another clinical study found that the key components in Hydroxycut Hardcore were proven to increase the body’s primary fat-burning hormone, norepinephrine (NE), by an incredible average of 40 percent! With all that norepinephrine flowing through your system, you’re certain to become a fat-burning inferno!

      In a clinical study, subjects using Hydroxycut Hardcore’s key component decreased bodyfat by an astounding average of 7.9% more than a control group!

      And all of this is delivered to your system using the amazing LiquiTech™ capsules. These innovative capsules are equipped with a rapid-release liquid Micro-Dispersion Technology that allows the Hydroxycut Hardcore formula to get to work immediately after you take a serving.

      This all boils down to Hydroxycut Hardcore turning you into the most effective and hardcore fat-burning machine you can be!

      Q: How should I begin using Hydroxycut Hardcore? When should I take it?

      A: As a dietary supplement, take 3 capsules with an 8-oz. glass of water twice daily, approximately 30 to 60 minutes before meals. On days you workout, take one of these servings before the workout. Consume ten 8-oz. glasses of water per day. Read the entire label before use and follow directions. Do not exceed 3 capsules in a 4-hour period and/or 6 caplets in a 24-hour period. Do not take within 5 hours of bedtime. To assess individual tolerance, follow the chart. For best results, combine Hydroxycut® Hardcore with an intense exercise and nutrition program.

      Day 1 to Day 3 1 capsule, 2x daily
      Day 4 to Day 7 2 capsule, 2x daily
      Day 8 & beyond 3 capsule, 2x daily

      How to remove minor paint scratches

      How to remove minor scratches

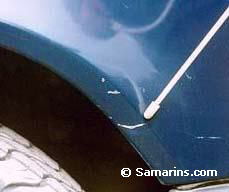
      car_care5 Look at the image, these scratches on the trunk were made by the bushes.
      It’s not a big problem, but…
      I will remove these scratches in two steps:
      First, I use polishing compound to polish the scratches. It contains mild abrasive and removes very thin coat of painting. When you will shop for this kind of product, there are few grades available. You need the one that contains the finest abrasive.
      car_care6 I put a little amount of polishing compound onto a damp sponge and buff the scratched area in a circular motion until scratches disappear. But don’t overdo it. I’d suggest trying a small area first, to get used to the process. Then I wash off the area completely.
      car_care7Now it’s time to use a liquid wax. I squeeze a little amount of wax onto a sponge and spread evenly on the scratched area. I wait a little allowing product to haze, then, using a soft towel, I buff the wax.
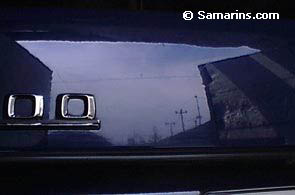
      car_care8 Now you see the result.